Hyundai Kona: Wireless Power Charger System / Wireless Power Charging Unit Repair procedures
| Removal |
Handling wireless charging system parts by wet hands may cause electric
shock.
|

| 1. |
Disconnect the negative (-) battery terminal.
|
| 2. |
Remove the floor console cover assembly.
(Refer to Body - "Floor Console Assembly")
|
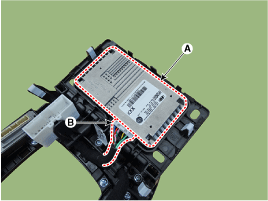
| 3. |
Remove the wireless power charger unit (A) after mounting screws
and disconnecting the connector (B).
|
| Installation |
| 1. |
Install the wireless power charging unit.
|
| 2. |
Connect the wireless power charging unit connectors.
|
| 3. |
Install the floor console assembly.
|
| 4. |
Connect the negative (-) battery terminal.
|
| [Diagnosis With KDS/GDS] |
| 1. |
The body electrical system can be more quickly diagnosed for troubles
by using the vehicle diagnostic system (KDS/GDS).
KDS/GDS provides the following information.
|
| 2. |
To diagnose the vehicle by using the diagnostic equipment, select
"vehicle model" and "wireless power charger system" to be inspected.
|
| 3. |
To inquire the current status of input/output values, select the
"Sensor Data" menu
The input/output values of the sensors corresponding to the selected
module can be checked.
|

| 4. |
To perform forced operation of the selected module input, select
"Actuation Test".
|

| 5. |
To inquire the cause of trouble for each module by self diagnosis,
select 'Diagnostic Trouble Code'.
|

 Wireless Power Charging Unit Circuit diagram
Circuit Diagram
...
 Wireless Charging Lamp Components and positions
Components
...
Other information:
Hyundai Kona (OS) 2018-2024 Service Manual: Timing Chain Cover & Oil Pump Assembly Repair procedures
Removal
•
Use fender covers to avoid damaging painted surfaces.
•
To avoid damage, unplug the wiring connectors carefully while
...
Hyundai Kona (OS) 2018-2024 Service Manual: Heater & A/C Control Unit (Manual) Components and components location
Components
Connector [A]
Pin NO
Function
Pin NO
Function
1
Low
4
Middle Low
2
Common
5
...
